

Introduction: How Build Vertical Garden Planters
Download (28.1 MB, 30 mins 26 secs)
Last week during the garden update, I discussed my new vertical garden planters made from two vinyl gutters. After I posted the article and podcast, I realized that it had been a while since I discussed this topic, and I have never discussed how to build vertical gardens on fences before. In this post and episode, I will discuss the following topics:
- What is a vertical garden?
- Benefits and challenges of vertical garden planters
- Materials needed to build vertical garden planters
- Step-by-step guide for building vertical garden planters
What is a Vertical Garden?

The Plant Charmer has revolutionized growing food vertically!
Vertical gardens are growing techniques that take advantage of unused vertical space to grow vegetables, herbs or flowers. There are several types of vertical gardening techniques that can be used effectively in any garden:
- Trellises – Making use of trellises for certain plants such as tomatoes, cucumbers, pole beans, sugar snap peas, grapes, squashes and gourds, etc.
- Hanging Planters – Using elevated planters that put plants in the air and specifically grow in used vertical space.
I have used both techniques effectively over the years. I am a huge fan of trellis gardening, and I use trellises exclusively for a number of plants in my garden. I will have another article that discusses my trellis and technique.
Hanging planters are another way to let plants grow in the air and maximize unused space. I discussed vertical gardens before in the following articles and podcasts here on Small Scale Life:
- Vertical Garden 101: Introduction to Vertical Gardening
- Vertical Garden 102: How to Build a Vertical Garden
- Vertical Gardening with the Plant Charmer Part 1
- Vertical Gardening with the Plant Charmer Part 2
There has been a lot of change since those articles and podcasts! The Plant Charmer has expanded his farming operation using vertical gardening techniques exclusively, and I have relocated from St. Louis Park to the current homestead in Minneapolis.
What are the Benefits and Challenges of Vertical Garden Planters?

Garden Bed 4 and 5 with the Vertical Garden in happier and healthier times – 7/21/16
As I think about my two vertical gardening projects, I have found that there are some benefits and challenges to having vertical garden planters.
Benefits
- Maximizing Space – This is critical when you don’t have the acreage for your gardening operations. I can maximize the unused space along my fence and not dig up more of the yard (the dog might do that for me)!
- Inexpensive – I constructed my two gutters and filled them with high quality garden soil for less than $30. I have the materials listed below. You can reduce that cost by finding and using materials you might have in your garage and second-hand gutters (I just got some for FREE).
- Simple to Construct – These are simple systems to construct, and little carpentry skill is required. Of course, you are building your own skills by using the skill saw and a drill! If you don’t have a skill saw, you can have the home improvement store cut the boards to the size you need.
- Animals Can’t Reach – One big benefit from using vertical garden planters is that you can build them high enough to deter dogs and rabbits from digging up your soil and eating your produce. Considering the fun I have been having lately, I am REALLY leaning to developing more vertical garden planters in 2019.
- No Bending – Because your garden is elevated, you do not have to bend too far down to maintain your vertical garden or harvest flowers, herbs and/or produce. This is a godsend for older gardeners or gardeners with bad backs!
- Interesting Topic of Discussion – People will be interested in how you are growing food in gutters, and it will be a natural topic of conversation. That is building social capital in your neighborhood and community.
Challenges
- Watering – One major drawback of this system is that these elevated beds WILL dry out. You need to water them as soon as the soil gets dry, and failure to water the plants will result in crispy critters. This is not a fire-and-forget system like self-watering planters (wicking beds). Khaled uses drip tape with timers to water his plants, and I resort to hand watering with a watering can from the rain barrel. If you are traveling, you will need someone to water your plants or at least make sure your watering system is working properly.
- Limited Area for Root Development – The gutters provide about 3” of soil for root development. Some plants need more soil for root development, and you certainly will not plant potatoes or carrots in these planters. In my previous articles, Khaled and others discussed what plants did well and not so well in these systems. So far, I am having a good onion crop, so I will keep on watching how the onions, basil and peppers do this summer.
- Replacing Nutrients – One good think about Karma the Dog digging in the garden is by overturning the soil, I got to see how many worms and how much life is in the soil. Unfortunately, there is no way for that kind of life to fly into the gutters. Crops will deplete the nutrients in the soil, and I will have to develop methods to replace the nutrients naturally and organically (without adding a ton of fertilizer). I have a feeling that certain crops like bush beans and peas, worm castings and organic “compost teas” are going to be the way to go with these planters.
Overall, I think the benefits (and the bang for the buck) outweigh the challenges, and these garden planters provide a new excuse to try some new products and techniques in the garden!
How to Build Vertical Garden Planters on Fences

Here is the view of the 1×4’s, zip ties and the L brackets supporting the vertical garden on the fence – June 2018
For this project, you will need the following materials:
- 2 vinyl gutters (Optional: could be repurposed metal gutters)
- 2 green treat 2×4’s (Optional: 4×4 posts instead)
- 2 green treat 1×4’s (10 feet long) – these will be the shelves for the gutters
- 1” deck screws (I had some of these on hand)
- 1 bag of 12” zip ties
- 1 bag of garden soil
- 6 “L” brackets (for attaching the 1×4 “shelves” to the posts)
- Optional: Vermiculite (I added some to my garden soil mix)
- Optional: Peat Moss
For tools, I used the following:
- Drill with assorted bits
- Skill saw
- Measuring tape
- Level (because I am an engineer sometimes
- Pencil or Sharpie marker
Keep in mind that I did not dig any holes for this project! I am using the strength of the fence to hold up the gutters (filled with soil, plants and moisture).
To make more permanent gardens, you can dig holes for 4×4 posts and not use the 2×4’s. Before you dig: I caution you to call and locate the utilities. You would have to puncture a line or wire while you are building a vertical garden!
Step 1: Measure the Fence
First things first: measure the fence and make sure you know how much distance is between the poles. You want to work with the poles on your fence because that will anchor the gutter and keep it from falling down.
I found that my chain link fence posts are about 9’ apart. The posts are about 48” high.
Step 2: Measure and Cut the 2×4’s
These two gutters are attached to three 2×4’s. Two of the 2×4’s are zip tied to the chain link fence posts for support. The third 2×4 is in the middle of the garden to provide some support.
I measured the 2×4’s and cut them in half. I then measured and made lines at the 6” and 18” mark on each 2×4 post. These are the bottoms of the vertical gutters.
As in my previous Vertical Garden project, I am keeping with a 12” spacing between the gutters. This also follows how my friend Khaled constructed his free-standing vertical gardens as well.
Step 3: Attach the 2×4’s to the Chain Link Posts
Using the drill, I drilled holes big enough to thread the zip ties through the holes. I looped the zip ties around the vertical chain link posts and the 2×4’s. I used four for the end 2×4 posts.
For the middle 2×4, I would use it as a gutter support. There was no middle post to attach to; however, in hindsight, I should have used the same method to attach to the horizontal post on the top of the chain link fence. It would have solidified the middle a bit more.
Step 4: Attach the 1×4 “Shelves”
When I constructed the vertical garden in 2016, I used 2×2’s under the gutters to provide some stability to the system. Having some support under the gutter does help a lot, especially once the soil soaks up rainwater.
How do I know?
Well, I went ahead and put the vertical garden on the fence, and I thought the vinyl was rigid enough to support the soil, plants and moisture. After it rained, the gutters started to lean forward (away from the fence).
I made a mistake. I had to add the 1×4 shelves to support the gutters and take out the bend in the vinyl. While I could have used 2×2’s or smaller boards for support, I could not find any smaller boards at the local Menards and Home Depot. I decided to use the 10’ 1×4’s.
Since I was retrofitting the vertical gardens on the fence, I attached the L brackets under the gutter. Then I slid the 1×4 onto the L brackets (and under the gutters). The gutters stopped bowing, and we were happy with the results! The picture on the cover of this podcast shows the current state of the vertical garden on the fence.
Step 5: Drill Drainage Holes
With a 1/8” drill bit, I drilled drainage holes in the gutter. Following Khaled‘s advice, I drilled one hole in the side facing me every 16″. That is correct: I drilled one hole on one side every 16″. Gutters in the sun will dry out quickly, and by reducing the number of drainage holes will retain moisture a bit longer.
Step 6: Add Soil and Plants
In my previous vertical gardening planters, I used equal parts of soil, vermiculite and peat moss. It worked pretty well, although peat moss takes a long time to absorb moisture. That can be detrimental when you are trying to retain as much water as you can in a limited space.
With the new vertical garden planters, I am using a 60%-40% mix of soil and vermiculite. For more on soil mixes, check out my previous article about vertical gardening.In a wheel barrow, I mixed up a 60% garden soil and 40% vermiculite mix. I then scooped up the soil and added it into the gutters.
With the soil in the gutters, I added the onions, basil and peppers. I watered everything by hand with a watering can, and then it was time to wait and watch.
Final Note
As you might have observed, I did not add end caps to the gutters. Neither do Zack from “ZackOutside” or Khaled. I simply do not have soil and plant within 4″ of the end, and I have not had any issues with soil loss during heavy rain storms (soil loss was not significant).
Putting It All Together
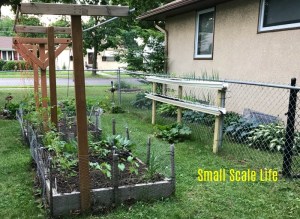
The 2018 garden is coming along – June 2018
As this picture of my 2018 garden shows, you can really maximize your space using vertical garden planters. They are easy and inexpensive to construct and maintain. I am looking forward to seeing how these onions, peppers and basil plants do this season, and I will be ready with greens for the Fall season. Let’s see what this garden system can do!
If you want to know more about gardening, check out the Gardening Gateway page here on Small Scale Life. There are a lot of resources about starting plants, blight and pests, vertical gardening and a host of other topics for you there.